

Round nose Pliers
20 gauge Wire
(56)4mm Black Beads
(48)#5 Black bugle beads
(16)6mm red Beads
(1) 25 mm Red Bead
(1) 12mm Black Bead
(2)Small Metal Bead Caps
(2) Large Black Bead Caps
(1) 3 inch Headpin
Prepare Wire
I am using 20-gauge wire, but you can use other gauges. You'll just need to make sure that the wire fits through all of the beads.
Cut 4 pieces of wire to about 10-12 inches each.
At the 1 end of each wire, bend a small loop. This will prevent the beads from sliding off the end of the wire.
To do this, pinch the very end of the wire with round-nose pliers and wrap it around to form a small circle.
Spider Legs
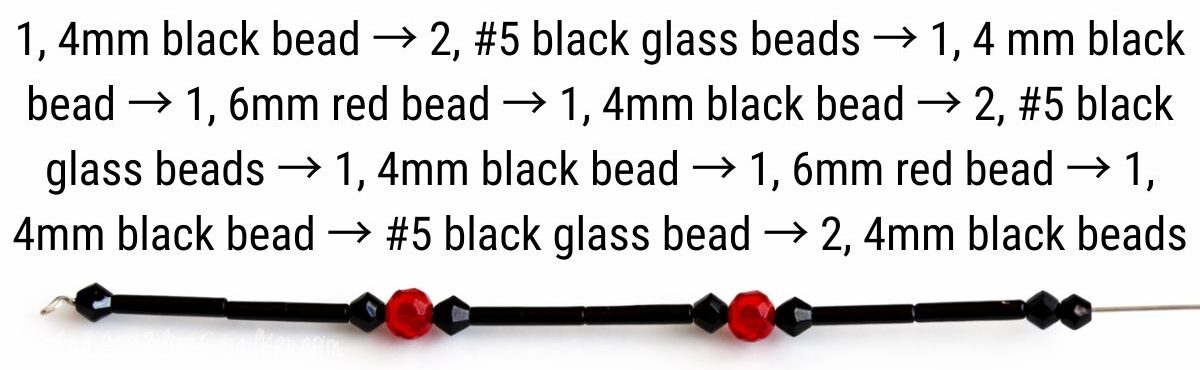
With each wire strand, you'll want to repeat this pattern. These will be the spider's legs.
String the beads all the way so they are tight against the end loop you made in the wire.
After all four wires are strung with the same bead pattern, make sure the legs are even and clasped tightly with round-nose pliers.
This part is a little tricky. As you can see in the kinky ends of the wires, I had to do this a couple of times before I was happy with the results.
Hold the pliers tightly and twist the legs. You'll want a nice, tight twist like shown in the second picture.
Create the head of the spider by putting the headpin through 1 small bead cap -> 1 12mm black bead -> 1 small bead cap.
Poke the headpin between the wires already twisted for the legs, and continue to twist the wires to secure the headpin.
This step is a little tricky, and 3 hands would be helpful because you don't want the headpin to fall out of the twist while you twist.
I held the 4 wires a little farther down the strands and twisted them more.
To the headpin, add the large bead cap -> 25mm red bead -> large bead cap -> 1, 4mm black bead to the end of the headpin for the abdomen of the spider.
At the end of the headpin, I made a wire-wrapping loop to keep everything secure and together.
My cute little spider is coming along, but he isn't quite finished yet. He needs 4 more legs!
No comments:
Post a Comment